We are still doing our Olympic Cooking thing, although the oldest was in OH for the summer and we had my nephew living with us for the summer, so the audience was a bit different. We focused on desserts, primarily, this time around. In part because I was in the hospital and recovering when I would normally be planning out the menus and the Olympics snuck up on me this year. It is getting harder and harder not to duplicate more countries, but that's a good thing. As of the end of the Paris 2024 Olympic Games, we have been doing this cooking thing for 7 Olympic Games, making 110 Olympic meals/desserts from 74 different countries (obviously some countries have been repeats). See the map below for the countries we covered in each Olympic Games or check out the rest of the blog. For someone who does not enjoy cooking, that is truly a feat to be celebrated! We started out doing a lot more in depth learning about each country, but as the kids grew and time was more valuable, we moved more toward a taste of each place. Yes, some of the recipes have been made multiple times because they have become a favorite of one of us. It's been a journey. During the next Olympics, Chip and I will be empty nesters, so I really don't know if this tradition will continue, but I've had a blast doing it and I do think that my kids (well, maybe two of them, at least!) appreciate what we've done. If you've joined us for the ride, I hope you learned somethings or found some new recipes to try.

Anywho, for Paris 2024 Olympic Cooking, I will just give you brief synopsis of each dish and a link to the recipe we used to prepare it. All 16 countries in one post since I really don't use this platform anymore. Enjoy!Olympic Cooking, Day 1
Crème Brûlée from France
We had fun with the blowtorch! Obvs this was our French dessert and most of us thought it was yummy. Easy to make and a nice pleasantly light flavor.
RECIPE -> https://natashaskitchen.com/quick-creme-brulee-recipe/
Olympic Cooking, Day 2
Creponné from Algeria
Creponne is supposed to be a lemon sorbet but ours was a bit more of a lemon ice. This may have happened in translation, since the recipe was in French, and though I took French in high school and college, was translated by google. Definitely not for people who do not like lemon, but still pretty good!
Olympic Cooking, Day 3
Honey Babka from the Ukraine
Honey Babka is good. The flavor is a little like carrot cake without the carrots - a rich, lasting flavor. The texture is dense… Bug says it almost sponge like. Overall, not something we will make with any frequency, but not bad. Heads up that this recipe made A LOT of cake.
Olympic Cooking, Day 4
Gateau Napolitaines from Mauritius
I may have pink fingers for a few days after this one, but the end result is a sweet treat. These are a sandwich cookie (similar to the Linzer cookies from Austria last Olympics) dipped in frosting. Bug says she liked these but liked the Linzer more. Heads up, a little dab of pink will go a long way! Also, we used jelly because I didn't want to buy more jam, but I think the jam may have been a thicker bond with the cookies. The jelly was a little loose for dipping.
Olympic Cooking, Day 5
Paraguayan Chipas
Chipas - a bagel-like dense bread made with cheese. These were good, although Ebabe says she would like them more if the cheese was melted on top or stuffed into the center. I told her to call Paraguay and make her suggestions, lol. She didn't take me up on that. These were better warm than cold.
Olympic Cooking Day 6
Mango Fool from Ghana
I had to substitute arrowroot powder for custard powder, since I could not find that at any of the local grocers, but it worked pretty well. I garnished this with fresh papaya. This is not a sweet dessert, but it is quite flavorful. I also learned that my youngest two and my oldest nephew do not like papaya… more for me.
Olympic Cooking, Day 7
Egyptian Meshabek
Meshabek is essentially funnel cake. Unfortunately I don’t have a squeeze bottle to put the batter in so I could get the typical small spiral dough, but it tasted good even in a larger, chunkier size. Everyone liked them but we all agree a little goes a long way! Tasted a bit like if French toast and croissants blended together and were dipped in a citrus syrup.
Olympic Cooking, Day 8
Alfajores with Dulce de Leche from Uruguay
These are really flavorful, but the recipe said to use a biscuit cutter and that frankly seems to be too big in hindsight. These would be perfect if they were an inch in diameter. They were delicious, anyway, but a little too much. The cookie was similar to a shortbread, the dulce de leche was thick and gooey, and the coconut was toasted perfection. They kept well and were enjoyed for several days.
Olympic Cooking, Day 9
Bojo Cake from Suriname
Before I tell you about taste, I must say that this is the first time I’ve almost accidentally poisoned myself while preparing an unfamiliar recipe. DO NOT eat raw cassava…. Thankfully I only had a few shreds since it looked like coconut before I googled and realized that it is not to be eaten raw. I’m fine, but it could have been bad. And of course that experience made me hyper concerned about making sure I prepared the recipe correctly. Since no one got sick, I’m guessing I did okay. Whew! If you decide to make this, find a tutorial on how to cut it properly. I ended up boiling the cassava prior to baking, as well. So Bojo cake was quite flavorful with pineapple, rum soaked raisins, coconut, and cassava, but the texture was a little odd. It felt more like a pineapple pie than a cake. Overall, I probably won’t be making this again, even though I got really good at peeling cassava, but I may make a pineapple upside down cake in the future…
Olympic Cooking, Day 10
German Cherry Streusel Cake
Yummy and I got to use my new springform pan! It tasted a lot like cherry pie. Ebabe wished I had used only sweet cherries, but I used a combination of sweet and tart. If you like things sweeter, omit the tart cherries when making the filling.
Olympic Cooking, Day 11
Mofo Gasy from Madagascar
These little muffin like pancakes were a disappointment. I started it at 9:30am, let it rest for 3 hours and it didn’t rise at all… after 7 hours it had only risen a little bit. The dough was very dry, so maybe I made the rice paste too thick?! Plus, I do not own an aebleskiver/appe pan so I had to made do with a mini muffin tin and a pan lid to prepare this on the stove top. I am not a fan of the rice flour/coconut milk flavor, even with the syrup. I saw variations of this recipe using regular flour and if I were to want to torture myself again by making this, I would probably try that. No one really enjoyed these very much but my nephew did say he would eat them for breakfast tomorrow. And I found out afterward that one of my good friends has an aebleskiver pan, so maybe I will try again at a later date.
Olympic Cooking, Day 12
Pan de Banano from Guatemala
So this was an easy one, but since we are moving Bug back to college over the next two days, I needed easy. Banana bread. Yum. I made it in my loaf pan, but I think that the intent of the recipe is to use a larger, shallower baking pan. I ended up having to bake mine a lot longer than the time in the recipe. We enjoyed this for breakfast before heading out to Indiana.
Olympic Cooking, Day 13
Milo Godzilla from Singapore
I didn't initially plan on making anything on this day, since we would be travelling for the majority of the day. However, at the hotel last night, I couldn't sleep so I spent some time looking for easy recipes for some of the countries that we haven't explored yet. And voila, this came up. A quick check and yes, Walmart carries the Milo required, so we were good to go once we got home.
Milo is apparently a very popular drink in Singapore. The addition of vanilla ice cream makes it a Milo Godzilla. The below recipe makes the Milo Dinosaur and then we added the ice cream on top to upgrade to the Godzilla.
This was sweet and crunchy and enjoyed by my hubby and nephew. I thought it was decent, but I don’t enjoy chocolate and this was definitely rich. Olympic Cooking, Day 14
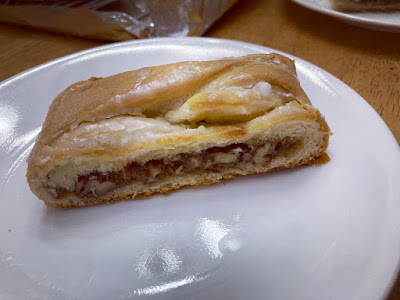
Heidelbeerenwahe from Switzerland
This was good. Not super sweet, but would be fantastic a la mode! I think we all liked it, at least those of us at home tonight. The blueberries were the sweetest part. Ebabe added a lot more powdered sugar to the top of hers.
Olympic Cooking, Day 15
Paletas de Coco from the Dominican Republic
These coconut milk popsicles are simple to make and a refreshing treat. These are very flavorful and very quick to prepare, other than freezing time. It’s cooler here today than it has been but I would guess these would be amazing on a hot August day.
Olympic Cooking, Day 16
Maho Halwa from Oman
A nutty caramel-like dessert. Tasty. Ebabe didn’t like them very much, but I learned today she doesn’t like nuts. She’s nuts. These got a little gooey after sitting on the counter for a while, but I just stuck them back in the fridge to firm up again.